Monday, April 16, 2012
Will Work to $ave Money!
Steel, Wood, Cast Iron, Fireproofing, and more Wood! The last few weekends have been full of opportunity. and then... the follow through of deciding to grab that opportunity before it passed. while having dinner with a good friend of ours, also a local contractor, Amy and I had the chance to put our horribly inefficient, and expensive electric furnace on the back burner :) (pun intended). Our friend, Bob offered us a wood burning fireplace insert, which was "taking up space in the shop." I told him I would go take a look at it, and see if I had a use for it. so, I checked it out, looked up the information on it, and found that it is a high end, efficient European model! a Jotul C350. It has a few frilly curvy lines to it, but hey, I can deal with that for FREE!! Amy and I have looked into this upgrade to our house for some time now, and each time we seriously checked it out, we were pretty easily staring at a $4,000 bill, which has never been an option. this was something we had to jump on, and quick! why quick?? allow me to explain the snowball...
get wood burning stove, fit stove into existing construction,(while double checking that all combustible clearances are a-ok) add new flue through existing chimney, weather proof new flue at top of chimney, burn woo-- wait, can't burn yet, must make surround for the stove, run power to stove to run the fans (fans help this beast heat the whole house), burn woo-- must have dry wood, get firewood, have place to store firewood, have place to store and dry (here's the time issue. it takes at least 6 months to dry wood) enough firewood to last a cold season... whew! this just turned into a full on project! so... go snag some firewood from the neighbor's pile to use the stove for a few nights... :)
Steel, Cast Iron, Fireproofing
now, the real challenge of all of this was to do the rest of this with zero-no budget. a plus of working in the building industry is that you quickly build up a network of people you can call with questions, or to have access to materials otherwise not available at the local hardware store, (that's you, crappy Ace Hardware on Bainbridge Island). through these connections, I was able to get a hold of some nice hot rolled steel plate to build us a nice surround for the stove. it turned out great, and really completes the fireplace wall that we built last summer. the surround is made up of 3 steel plate sections, and a perimeter of steel angle. by welding everything together from the back, I was able to keep it clean, and movable as one piece. it is held in place by only 2 screws, so it is easy to remove for maintenance at any time.
wood stove install summary: Jotul insert (free)
stainless double-wall full height flue (free (another Bob donation))
fabricated sheet metal chimney cap
(1) bundle rock wool (fireproof insulation)
(1) sheet hot rolled steel
wood stove sub project: hand forge a poker.
yes, hand forge. its fun. all the cool kids are doing it. I hang out with a great group of guys/craftsmen/artists on Tuesday Nights, usually at a blacksmith shop here on the island. last week, I thought an appropriate project would be to forge a poker. luckily, Jay Trinidad, a local photographer, and friend, brought his camera that night, and captured the process. these photos are all Jay's handiwork, you can see more of his inspiring work here.
Wood, and more Wood
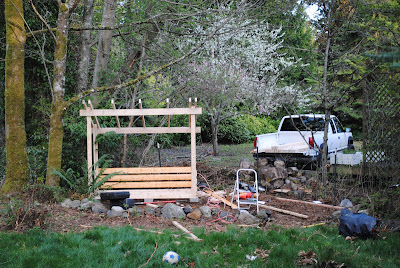
upon asking around about firewood, I quickly discovered that with some labor, I could have more than enough firewood for us to use, but it would not be ready to burn now, it would have to be dried/seasoned, and to do that around here, it needs to be stacked right about NOW. must have firewood shed(s). next is a challenge that every Architect should have to go through. build a structure that can hold 2+ cords of firewood with as few pieces of lumber as possible with the fewest cuts, all square, as little waste as possible, and every aspect of the structure must be the cheapest material of its kind. as a system, it must provide shelter, and be stable (stand up to wind, rain, snow, etc.) and structurally sound. this was fun. that nerdy kind of fun, where you spend way too much time tweaking things in order to make it more efficient, fewer parts and pieces. to the point where if you ask your wife one more question about it, she's going to throw things at you, or lock you out of the house :) the sheds that resulted from this process are now something we are proud of, and will be a vital part of keeping us warm for winters to come.
shed summary: (50) cheap 2x4 framing lumber
(4) cheap 2x6
(8) cheap corrugated metal panels
(12) CMU blocks (already own)
(16) 16' 1x boards (past free score, already used some for baseboards
throughout the house)
pile of waste:
altogether, this was a much more in depth project (aren't they always?!) than I originally anticipated. but with the use of free parts, some good hard work, and a tight (read as 'no') budget, we can now look forward to heating our house 'off the grid'. take that, power outages! (they happen a lot here on the island).
A huge thanks To Bob Grimm for this opportunity. without him, none of this would have been possible! much appreciated.
next week: back to the truck. I am dangerously close to spraying primer on the whole cab. big steps to come...
Monday, March 5, 2012
the smell of hot steel
I love the smell of hot steel. I mean, hot enough that when anything combustible is even close, it just bursts into flames. It's that badass. it may be the memories of being in the machine shop with my Dad as a kid, and growing up. maybe its that I associate it with being productive. could be because I like making sparks, and playing with dangerous toys, I don't know. I'm just wired that way, and I like it!
the last few weekends, with the exception of some sick time, have been productive. not a lot of eye candy, or large, dramatic steps here, but moving forward nonetheless. I have been cutting out areas with rust, patching in new metal, and getting away with just welding (no cutting and patching) where possible. there are lots of small pinholes that I am able to just fill with weld, then grind back down to smooth.
This past weekend, I got her out in the daylight for a bath. I am getting pretty close to shooting the first coat of primer on the whole cab, and I needed to get some of the 40 year old dirt out from where the gas tank used to be. this also allowed me to fill some cavities in the cab with water, and spot other pinholes that I was otherwise unable to see. welding those up was... interesting. it is hard enough to weld something that is hard to reach, mix in some welding over your head, and you get burnt hair pretty quickly! ouch.
so, small steps generally, but important steps. now I should be leak free in the cab (important in the rainy NW)
some pretty sweet photos over the past few weekends. enjoy!
Monday, February 13, 2012
ECHO, ECho... echo.....
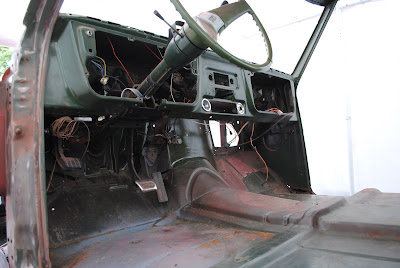
The last two weeks have consisted of some fairly small steps that have quickly lead to what seems to be a giant leap in the very near future. As of now, the only part of the truck left on the frame is the cab. And a hollow, empty cab it is! I spent the better part of last weekend stripping the cab down to nothing but bare metal. now... I first decided to do this build based on the absolute simplicity, and utilitarianism of these specific model trucks. that being said, WHERE DID ALL OF THIS STUFF COME FROM?!?! I really thought it would take me the better half of Saturday morning to strip the cab of all it's goodies. seat, gas tank, instrument cluster, radio, ash tray, seat belts,weather stripping, wiring, heater controls. well, it turns out that roughly 60 years of GM discovering clever ways of fitting clips in, hiding fasteners, and their "hold your tongue this way," and "fart sideways" approach to disassembling their interior parts, turns a "simple" cab design into an entire weekend of dismantling. good news is: its all cleaned out, washed out, and ready for rust repair and body work before I get the ENTIRE cab of the truck red. there is a lot of surface area on these cabs, and very little of it is flat. lots of small areas and directional changes, so the sanding job alone is a daunting one. here's to one giant leap!
oh! and to you 99.7% of North Westerners that don't wash your car all winter.... and maybe twice all summer... you know that green stuff that grows in the seals of all of your many windows on your Subaru wagons? its moss. and it holds moisture. forever. take note of the rusty holes here.
notice the gloss preserved here. this is 41 yr old paint protected from sun, and water. this is the first time this paint has ever seen daylight! still looks like the day it was sprayed.
and here's what happens when I need a break from grinding on sheet metal. an unassuming pile of truck parts becomes a model for the next generation of TONKA truck :)
Monday, January 9, 2012
new life, new paint, old rust
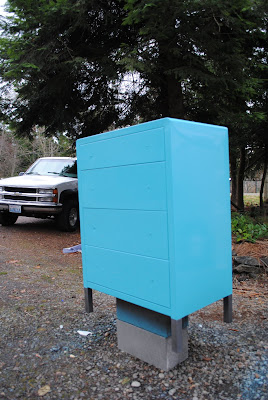
Practice makes perfect, or closer to it, anyway. Since the Holidays, I have been working on a vintage steel dresser for close friends. They are having their first baby, and this will go in Baby Rausch's room, exciting time for everyone, and a great opportunity for me to practice metal prep, shooting paint, and buffing/polishing techniques. I really wanted to push the amount of reducer in the paint just to see how thin I could get it (in order for the paint to "flow out" well, and create a nice glassy smooth surface.) after the first coat, which had a few nice long runs in it, I seemed to have found the sweet spot, and I was PUMPED that it turned out so well! the dresser looks great. it took some work, and I still color sanded, and polished it in the end, but that was the purpose of this one. get used to the process, the settings on the tools, and redo where necessary until I was happy with the finished product. mission accomplished. ultimately, more pumped about the new baby (coming soon), but the dresser is cool too :)
on the truck: I spent this last sunday taking all of the glass, rubber, and doors off of the cab. I will still be marching forward with the progress on the front end, but that requires buying black paint for the suspension parts. the holidays and sketchy job market have me a bit short in the financial department, so my next few steps will be a balance of using what is available to me already, and smart spending on what is necessary. I don't, by any means, consider this a stall in the project. In fact, this will make me all that more proud of the build when it is rollin down the road. take that, crappy economy!!
enjoy some pictures... there is some rust in the windshield channel, I was actually relieved to find this, as it will fix an annoying leak under the dash. more posts to come about fixing 40 yr old metal and seams between panels.
thanks for checking in..., Happy New Year, let's hope the Mayans were wrong, and it won't be the last!
Subscribe to:
Posts (Atom)